What's new

Installing a Winch on a Trail Boss

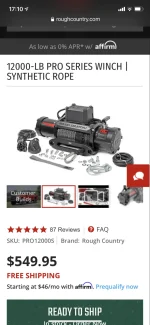
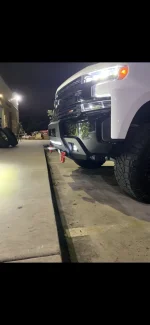
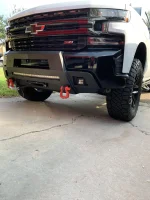
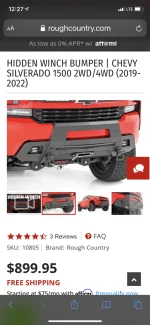
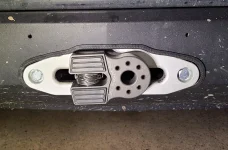
I am very seriously considering modifying the Front Receiver that I have, instead of sending it back. This will involve some heavy-duty cutting of steel channel, and getting my neighbor or a shop to weld it for me. But I will have the component that I want. It will fit the way that I want. And it will validate any drawing that I make. Perhaps Draw-Tite will use the drawing to make a part that fits this model TB. Perhaps they won't.

But we will still have a part that fits this particular model year Trail Boss. And anyone who has the skills, or that can hire a shop, can use the drawing and acquire one. And we can have it whether Draw-Tite, or Curt or Reese makes it or not.

I have done quite a lot of looking at what is available, and the differences. And it seems to me that a front receiver that fits my truck is either NOT available, or can only be had by using one meant for another model, or by modifying one.

When I needed a new Engine Mount for my Cozy MKIV homebuilt, I studied a set of plans, cut the 3/4" 4130 steel tubing and notched the ends myself. Then I had a neighbor at the airport tack it in a jig, with his welder in his hangar. And then I took it to a very reputable welder and had it completed. This was a much more complex part than the front receiver. And a MUCH MORE CRITICAL part ... the engine mount for an airplane.

EngineMount.JPG


I took this mount to a well-known welder in Longmont named Hank. He was trusted for decades with welding for racing cars and for aircraft. My engine mount was the last work that he did before retiring with terminal cancer.

(Note: the engine is mounted at the rear of these canard homebuilt airplanes.)
 
Last edited:
Did you confirm that this is the correct part?

This pic is from your first post. It shows an already installed hitch on a Trail Boss.


frontrcvrphoto-png.2426


The hidden winch set up from RC fits both non Trail Boss and Trail Boss as confirmed by RC's own pics and a fellow member on here. It bolts up to the same location. I really wonder if they sent the wrong one.
That "RC" is Rough Country? If so, I have looked at their Web site, and they no longer list a Front Receiver for any make/model of 4x4.
 
I was able to move along on this project today. I drove my TB up on the ramps again, and test fitted a cardstock template on the available bolts. Now I have transferred that pattern to stiffer corrugated plastic and in two examples. The next step is to remove nuts & bolts and Bolt Up both of these plastic templates. After that I can make the measurement for the shortened crossmember.

There is nothing in the way of having the endplates bolted to the Insides of the Frame, instead of the outsides. And, there is nothing in the way of having the crossmember mounted about 3 inches Higher than the original Draw-Tite Receiver. I have discovered a Welding & Fabrication Shop just 3 blocks East of me, right here in my own residential neighborhood. And finally, we will be sure to remove all indications that this part was originally built by Draw-Tite and sold by eTrailer ... just to absolve them of any liability.

EndBracket.jpeg


The following image shows how the original end plate will be cut down, and where the shortened crossmember will be re-welded to it. This will be done to both sides, and existing Bolts will be used very much as Draw-Tite intended. The Shims that Draw-Tite provided may be needed on the passenger sides, again just as the manufacturer indicated might be required.

NewBracket3.jpeg


This will result in the Front Receiver being about 15 inches from the ground, and still protruding from the rectangular hole I have already cut in the lower plastic bumper shroud. I will also make a mockup of the crossmember, and attach it to the plastic end plates, in order to check the fit and position. After that, I will make a drawing in the manner required for machinists and fabricators.
 
Last edited:
Second version of the End Plate mod drawing. The modification is simpler. I did the cuts to both end plates, and the cross member, in about 90 minutes with a cordless cutoff tool. The cross member is cut to a length of 25.75 inches, end-to-end. The 90 degree notch shown in the first drawing is not needed if one removes the "shipping tie-down loop" for clearance.

NOTE: This mounts the Receiver on the INSIDE of the truck frame, not the outside. The whole unit is ten pounds lighter. And my neighbor/welder who is a very experienced Off-roader and Fabricator believes the whole thing is again good for 9,000 lbs pull force.

Screen Shot 2022-02-22 at 11.24.34 AM.png
 
Last edited:
Here is why the Draw-Tite original part (discontinued), and the Draw-Tite DT45MR, and the Draw-Tite DT57MR (for Silverado 2500) all Do Not Fit:

The welded bracket at the center does not have the Hole for the original Receiver, or DT45MR. On the other side of this F frame is a horizontal member that interferes with the original (dicontinued) Receiver. The Receiver intended for Silverado 2500 (and a Curt unit) would attach to the horizontal hole at the Right Side Yellow dot. That would interfere with the Skid Plate attachment, and also the welded bracket at image center.

Note the Bolt End extending through the Shim, at Left. This is the only fastener on the passenger side that fits any of the Front Receiver units offered.
The bolt end extending through the welded bracket (lower center) is the one we need to drill a New Hole for in the Modified End Plate.
Forward_F_frame.jpeg


This is the Mock-up of the modified End Plate. Note that the "shipping tie-down loop" can be cut off, and the 90 degree notch in the End Plate is no longer needed. (Don't tell my wife that I cut both of these off.)
The small holes drilled in the mock-up Locate the lower corners of the cross member in order to weld that up.
MountedEndPlate.jpe
 
The resultant mounting provides a little over 14 inches of ground clearance. ALL of the receivers offered are much lower, giving only 11 inches off the ground. The Hole for the Receiver Pin does clear the lower Bumper Shroud so the Pin can be inserted.

GroundClearance.jpeg


This is Height and Extension forward that I wanted:
ProtrudingRcvr.jpeg
 
Last edited:
And Finally, this is the appearance of the Front Receiver when installed. This is what I wanted, as originally shown in this thread on an Earlier year TB and/or with a part that is either discontinued or does not fit the 2021 model year.

Appearance.jpeg


Also the Receiver Pin is not difficult to Insert, and the project is now complete. (Hooray! ... maybe now he will stop talking about it!)
RcvrPin.jpeg

Well ... except for Removing the whole thing at a later date, to complete the welds and paint the Front Receiver.
 
Last edited:
I have started a project to install a winch on my Trail Boss. So far I have researched the issue, compared prices and capacities, and have ordered all the initial equipment required.

Here is a Front Receiver that I have decided on. edit: Now has been delivered. And is a Different model.

NO FRONT RECEIVER CURRENTLY FITS A TRAIL BOSS. THIS PROJECT IS ON HOLD UNTIL I FIND ONE THAT FITS.

Here is what it looks like once it is installed:
View attachment 2426

Here is a typical 9,000 lb Rated Receiver Mount for a winch:
View attachment 2427
This one is the Lightest I could find, and I have had this for a few days, got it assembled. It has been discontinued at Harbor Freight. Others like this are much more expensive. It needs to be LIGHT, because the combined weight of the winch and the mount can easily exceed 90 lbs.

Here is the winch I decided on, after almost buying a Harbor Freight ZXR 9000. I like dealing with the Open Road folks:
View attachment 2428
The Harbor Freight winch had steel rope and Roller Fairlead (HEAVY!). I would have needed to spend more to replace those. This winch already has the MUCH LIGHTER synthetic rope and simple fairlead. So the combination of the Light-weight Receiver Mount and this Winch is about 80 lbs. That is about as light as I could find. The weight matters because I will need to carry the winch from the bed to the front receiver. And I'm 65 years old.

And here is the stuff needed to make a power cable long enough to reach the rear from the battery. A user explained that Yes, Indeed, he uses this wire set to run a winch and has recovered vehicles with it. This IS up to the task:
View attachment 2429
Rough country hidden winch , I had it installed a few months back
 

Attachments

  • 0E1DD3DA-9F5D-4FA0-A239-E71D01C60B59.png
    0E1DD3DA-9F5D-4FA0-A239-E71D01C60B59.png
    465.2 KB · Views: 68
  • BC68ED18-0DB7-429A-988C-53D4401995A4.png
    BC68ED18-0DB7-429A-988C-53D4401995A4.png
    951.6 KB · Views: 71
  • AE763DC8-C2DA-4176-908C-88DDFBA949F8.jpeg
    AE763DC8-C2DA-4176-908C-88DDFBA949F8.jpeg
    378.1 KB · Views: 73
  • 60597E1F-1FF4-45D7-B295-CF6E4180396B.png
    60597E1F-1FF4-45D7-B295-CF6E4180396B.png
    1.4 MB · Views: 77
  • 515FA778-F2E3-485B-A1CF-50468F66F43E.png
    515FA778-F2E3-485B-A1CF-50468F66F43E.png
    602.8 KB · Views: 67
That's a really elegant Bumper and Hidden Winch set up. Very different from the Receiver Mounted Winch that I did.

I also compared the costs of these two very different methods. The Rough Country Hidden winch Bumper and 12,000 lb winch total $1449.90

The Receiver Mounted OpenRoad 13,000 lb Winch and Receiver set up totals $995.90
But this includes:
- A more powerful winch than my 9,500 lb OpenRoad
- Receiver Mount for Front and Rear use (and actually the pricing for a stronger Tyrannosaurus Mount)
- Front Receiver for a Trail Boss truck
- The FORNEY 140 FCi WELDER to modify the Front Receiver and Teach Yourself How To Weld
- The 20ft Power Cable, Connectors and Crimp Tool
 
Here is why the Draw-Tite original part (discontinued), and the Draw-Tite DT45MR, and the Draw-Tite DT57MR (for Silverado 2500) all Do Not Fit:

The welded bracket at the center does not have the Hole for the original Receiver, or DT45MR. On the other side of this F frame is a horizontal member that interferes with the original (dicontinued) Receiver. The Receiver intended for Silverado 2500 (and a Curt unit) would attach to the horizontal hole at the Right Side Yellow dot. That would interfere with the Skid Plate attachment, and also the welded bracket at image center.

Note the Bolt End extending through the Shim, at Left. This is the only fastener on the passenger side that fits any of the Front Receiver units offered.
The bolt end extending through the welded bracket (lower center) is the one we need to drill a New Hole for in the Modified End Plate.
View attachment 2629

This is the Mock-up of the modified End Plate. Note that the "shipping tie-down loop" can be cut off, and the 90 degree notch in the End Plate is no longer needed. (Don't tell my wife that I cut both of these off.)
The small holes drilled in the mock-up Locate the lower corners of the cross member in order to weld that up.
View attachment 2630
I just removed those 2 brackets and installed flat washers for the Skid Plate. so mine would work. Side note, my previous employer stamps the 2 small air dam stays. But yeah, if I don't get a winch of some kind, I will removed the front hitch when winter is over and put everything back together for the other months.
 
You could always do a custom hidden winch setup as well...
 

Attachments

  • Fairlead.jpg
    Fairlead.jpg
    355.4 KB · Views: 11
I know you're trying to save weight, but those winch mounts have a bad reputation for twisting and breaking winches. It would be wise to cut a 3/8" plate of steel and place it under your winch to keep it rigid. You will need longer bolts to make it happen. Torson forces will cause catastrophic failure in a hard pull if that mount is only 1/4" thick. Seen it happen on the trail, not gonna let it happen to me.
After some recent training/practice off road, I have inspected my recovery gear, and the underside of the truck when changing the oil.
And the Winch. Here is an Update regarding the use of a Winch on a Receiver Mount.

I have to admit that watching this video was VERY useful when considering how I have mounted a winch. This guy destroyed a Receiver Mount:

Highlights of my use of a winch on a Trail Boss:
- Pulled an Elk Hunter out of snow in Boswell Creek, Wyoming;
- Maxed out the winch recovering a guy almost rolled off a mountain above Georgetown, CO;
- Ran winch hard in a test of a homemade "Rope Lock" (DIY Safe Extract X-Lock) with Pulley Rings to get above 10,000 lbs force.

WinchInUse.jpeg


And just as Midnight said ... the thin, cheap Winch mount has started to bend. When I first installed it, I was not prepared to reinforce the Mount. Now that I am comfortable with Welding, I have started a plan to cut up and re-weld the mount.

WinchMount.jpeg


The handles will be removed, and I'll cut the plate about an Inch outside of the mounting holes.
Then I'll use this metal and/or some other to make Flanges, and Gussets against the square tube. It's good to be able to weld.

edit: This thread included descriptions of a Front Receiver installation. Looking through, I realized I never uploaded an image of the Receiver after I completed the mods. This receiver has been pulled hard, several times. Inspections today revealed it's holding firm and straight. Unlike the Mount ...

FinishedReceiverMod.jpeg

.
 
Last edited:
It's good to be able to weld. I waited years before I could justify buying a welder and learning to weld.

I cut several inches of plate steel from both sides, which included the handles. Used some flat bar stock and other scrap and welded on as reinforcements. This piece required more welding than anything else I have done.
The parts that were cut off totaled more than 7 pounds, and the added pieces are less than half a pound. So instead of more than 82 lbs, the combination is only 75 pounds. I no longer need a small hand truck to move it around.

BeefedMount1.jpeg


BeefedMount2.jpeg


DownsizedMount.jpeg

.
 

Most Reactions

Back
Top