You are using an out of date browser. It may not display this or other websites correctly.
You should upgrade or use an alternative browser.
You should upgrade or use an alternative browser.
What did you do to your Trailboss today? 🛠️
- Thread starter Boss
- Start date
Brando
Member
Leveled the front with Supreme Suspensions 1" lower strut spacer, I like the leveled look and hoping it reduces rubbing on wheel liner at full lock, painted front calipers red while I was under there
Attachments
Last edited:
Baz
Well-known member
- Joined
- Oct 1, 2020
- Messages
- 377
- Media
- 89
- Reaction score
- 412
- Location
- British Columbia, CANADA
- Current Ride
- 2020 LT Trail Boss 6.2L
- Current Ride #2

- Military
 Canadian Army (Retired)
Added the Airaid intake tube to my factory cold air intake. A little more roar from the 6.2 and maybe a few more ponies.

A320BOSS
New member

dagedoty
Member
- Joined
- Apr 13, 2021
- Messages
- 78
- Media
- 27
- Reaction score
- 59
- Location
- Bucks County
- Current Ride
- 2021 Chevrolet LT Trail Boss 6.2
- Current Ride #2
- 2020 Camaro SS in Crush
- Military
- Retired Army
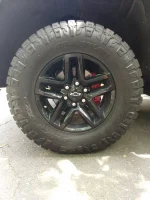
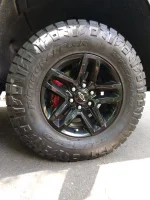
Happiest day of my life too.Installed the Pulsar LT, disabled Auto/Stop Start, DFM, throttle setting 3, and updated tire size. I have 315/70/R17 tires on my truck and had to configure to 33.6 inches (1 inch lower) to get the MPH calibrated with my GPS. Easy mod, loving new throttle setting. Let's see how much my MPG goes down after changing these settings.
View attachment 1228View attachment 1229
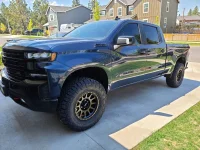
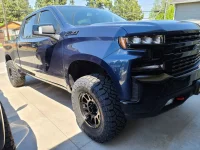
With your tires sticking out like that, if you ever leave pavement youll be flinging rocks into your body and every vehicle around you. Get some mudflaps, maybe fender flares. People wont be impressed when you crack their windshield.Zone off-road level with UCAs
Method 18x9 -12
Nitto Ridge Grapplers 35x12.5
Pulsar LT
-SB intake and JLT catch can this week
A320BOSS
New member
With your tires sticking out like that, if you ever leave pavement youll be flinging rocks into your body and every vehicle around you. Get some mudflaps, maybe fender flares. People wont be impressed when you crack their windshield.
 How fast do you drive off-road that you are throwing rocks to break windshields and who is following you that close? Doesn't sound like a good idea. I personally don't drive that fast off-road without a roll cage.
I appreciate the info.
Not my first rig. I currently have 2 other vehicles with small negative offsets and have no issues with paint chips on the body.
Last edited:
Even goimg normal road speeds youre flinging crap into other vehicles. Have some basic consideration. Ive had a lot of trucks like that with no mudflaps fling crap into me.
I appreciate the info.
Not my first rig. I currently have 2 other vehicles with small negative offsets and have no issues with paint chips on the body.
juicedgsr95
New member
- Joined
- May 28, 2021
- Messages
- 16
- Media
- 15
- Reaction score
- 35
- Location
- Wake Forest NC
- Current Ride
- 2021 LT Trail Boss
Readylift 1.75” level but only used the top spacer. Raised it 1” and I think it looks great!


Double Track
New member
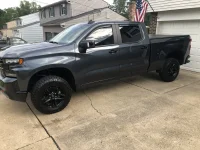
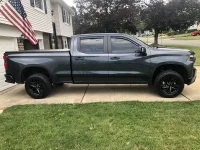
Where did you install a switch for your ditch lights?Instaled Rough Country 30" dual row curved light bar on front bumper. About 27,000 lumens. Combination flood/spot pattern. Fits like it was made just for this truck.
Also added Rough Country Ditch Lights. About 3000 lumens each. Flood pattern and installed to turn outwards up to 90 degrees. I can light up terain 180 degrees in front of me now.
Other Mods:
Go Rino Dominator D6 combo step/rock sliders. Has already saved my rocker panels.
2" front end leveling kit
Back Flip tri fold bed cover
Replaced tenporary spare with matching GoodYear Duratrack. Required new 18 inch wheel, spare is a 17.
Fitted work box under rear seats
Removed Trail Boss stickers
View attachment 1106View attachment 1107View attachment 1108View attachment 1109
PHXPHOTOG
Well-known member
Between the start button and the column there is a nice flat spot. I like the RC lights and everything seems well made except the switches seem a little cheap. The ditch lights come with the adhesive backed switch. Even though I cleaned the surface with alcohol it does not stay on. Of course it may have something to do with my cab reaching 800 degrees here in Phoenix!
If anyone is going to fish cable through a TB firewall use the passenger side access. There is a ruber boot on both sides (driver/passenger) you can cut open and fish through. I read many times you will never get through the drivers side. For what it's worth I believe it. When I went through the passenger side it was easy. The cables then go behind the center console to the driver side. Easy, clean, and out of sight.
If anyone is going to fish cable through a TB firewall use the passenger side access. There is a ruber boot on both sides (driver/passenger) you can cut open and fish through. I read many times you will never get through the drivers side. For what it's worth I believe it. When I went through the passenger side it was easy. The cables then go behind the center console to the driver side. Easy, clean, and out of sight.
PHXPHOTOG
Well-known member
Also, I cut the switch cable to do the fishing and spiced it back together after the cable was through the firewall. I don't think you can get anything bigger than cable through the wall.Between the start button and the column there is a nice flat spot. I like the RC lights and everything seems well made except the switches seem a little cheap. The ditch lights come with the adhesive backed switch. Even though I cleaned the surface with alcohol it does not stay on. Of course it may have something to do with my cab reaching 800 degrees here in Phoenix!
If anyone is going to fish cable through a TB firewall use the passenger side access. There is a ruber boot on both sides (driver/passenger) you can cut open and fish through. I read many times you will never get through the drivers side. For what it's worth I believe it. When I went through the passenger side it was easy. The cables then go behind the center console to the driver side. Easy, clean, and out of sight.
Double Track
New member
Awesome feedback!Also, I cut the switch cable to do the fishing and spiced it back together after the cable was through the firewall. I don't think you can get anything bigger than cable through the wall.
I already have BD fogs and want to go with their ditch lights. Just wasn't sure what to do about the firewall and/or switch. If possible, I want to use one of the dead switches.
PHXPHOTOG
Well-known member
If I can save you work I'm glad to. This was not a 2 hour instal for me. I had to figure it all out.Awesome feedback!
I already have BD fogs and want to go with their ditch lights. Just wasn't sure what to do about the firewall and/or switch. If possible, I want to use one of the dead switches.
The pictures are where I went through the fire wall. It's behind the battery. You can cut the boot open, fish cable, and zip tie it closed so it is perfect. I had some of that stiff 1/4 black plastic sprinkler hose in my garage. The stuff we use on drip systems here. I taped cables to that and it pushed right through to the cab. Then I pushed it behind the console to get to the drivers side.
I wanted to use a dead switch too. I read (did not talk to dealer) individual switches are not available to replace the plugs. Someone posted that they ordered a whole new switch panel for a Silverado RST because all 9 are switched. I did not want to go through all that. If you figure it out let me know.
I also added fiber washers to the light mounts where they would be metal on metal. That is so I can torque them down tight but I can still turn them by hand for beam adjustment. With my big light bar up front I turn the ditch lights more to the sides and I have an awesome field of view at night.
Have fun!
21sgstandard
New member
- Joined
- Mar 13, 2021
- Messages
- 14
- Media
- 8
- Reaction score
- 10
- Location
- Pittsburgh
- Current Ride
- 2013/f150
TrailBoss Forum Favs 👍


Trail Boss Forum Photos


Trail Boss Forum Photos